4!

My little girl is 4 years old already! I really can’t believe it. How time flies…

IMG_9854

To celebrate I sewed her a few fun birthday gifts. First up is a dress-up cloak sewn from the Oliver + S Book of Little Things to Sew. I have a separate post about it here if you’d like more details on it. As you can see from the picture, this girl loves her cloak! I can’t believe I hadn’t made her any other dress-up stuff before now. I think more will be in order soon!

IMG_9812

Of course I had to sew her a birthday dress and what birthday is complete without Nani Iro? I made her this gorgeous little number which you can read more about in my previous post here.

IMG_9790

Next up is a new outfit for her waldorf doll “Pearl” whom I made for her birthday last year. Poor thing had been sporting the same outfit for a whole year, so a top and pants were much needed and highly appreciated by my daughter who has finally gotten into keeping clothes on her dolls. The top is made from Liberty of London from my stash and the pants are from a linen/cotton chambray by Robert Kaufman which was leftover from a skirt I had made my daughter a few seasons ago. I love using up scraps 🙂

IMG_9789

Pearl’s new clothes!

IMG_9839

Last, but not least, I made her a doll carrier from the Oliver + S Book of Little Things to Sew. I just love using whimsical, dreamy fabric on little projects like this! Plus I’ve had this fabric living in my stash forever! So glad I found a good project to use some of it up.

IMG_9846

The fabric is from Heather Ross’ Far Far Away 2 and 3 collections. I’m addicted to Heather Ross in case you haven’t noticed 😉  She is one of my favorite fabric designers.

IMG_9840

Close up!

IMG_9842

Lamby love.

Happy birthday sweet Lily!


Easter pants and a birthday dress

IMG_9812

Easter and my daughter’s birthday tend to line up pretty nicely in terms of my sewing schedule as they are usually about a week apart. So instead of two separate dresses I sew her one special Birthday Easter dress to be worn on both occasions. I just love how this years dress came together!

IMG_9829

The sewing pattern I used is called “Adria full circle dress pattern” by AmelieClothing on Etsy. I knew I wanted a dress with amazing spin factor and since I had no patterns on hand that fit the bill I just browsed on Etsy until I saw this one, which fit my vision perfectly!

IMG_9831

I sewed the dress in size 3 width and 4 length in Nani Iro Fuwari Fuwari double gauze with the lining in Kaffe Shot cotton color pudding. I did modify the pattern some by lengthening the bodice by 1 inch so that the waist hit more at her natural waist. I also added a single layer of tulle between the lining and the skirt top to prevent the layers from sticking together and falling flat.

IMG_9816

I love the sweet v-back and the shoulder ties!

IMG_9828

Plus the spin-factor is a 10!

IMG_9835

Easter for my boy means new Sunday clothes and so I decided to make him a pair of dress pants from the Museum Trousers pattern by Oliver + S. I sewed them in size 18-24 month in the fabulous Herringbone Railroad Denim Deluxe in color Indigo by Robert Kaufman. This fabric is seriously dreamy; soft, supple, sturdy, and gorgeous! Please ignore my wonky leg length in this photo! They really are the same length but are hanging weird.

IMG_9836

Adorable welt pockets! I was a bit intimidated to try them but Oliver + S patterns make them so approachable. Give them a try!

IMG_9837

For my contrast fabric I used some Heather Ross’ Nursery Versery collection called This little piggy.

IMG_9810

Welt pockets in action 🙂

Happy Easter!

A union dot family affair

IMG_9801

I had said I would and here they finally are; union dot for everyone! I cannot state how much in love with this fabric I am! LOVE! This is Union dot chambray by Robert Kaufman. It’s lightweight, soft, and perfect for summery clothes.

IMG_9406

In a previous post I shared this skirt I had made for my daughter. Once it was complete I knew there had to be more! So I went ahead and made one for myself and for my daughter’s doll Pearl as well.

IMG_9792

Doesn’t Pearl look trés chic? Yes, it kind of clashes with her top. Poor Pearl doesn’t get much clothes-wise from me. Maybe another shirt will be in order..someday.

IMG_9798

For my skirt I followed the Lazy Days skirt pattern from Oliver + S but with the modification of including a lining. No see-through skirts for me!

IMG_9799

For my boy I made a bow-tie using the Prudent Baby bow-tie tutorial. This one is her “double fold bow-tie” which I really love. I’ve made both her simple and double bow-ties and if you’ve got the fabric to spare I’d say do the double! They keep their shape better when worn and have a fuller look.

IMG_9802

I love bow-ties!

IMG_9808

Mmm cake. I know how you feel, my boy.

Seashore Sundress Angled Seams ~Tutorial~

IMG_9283

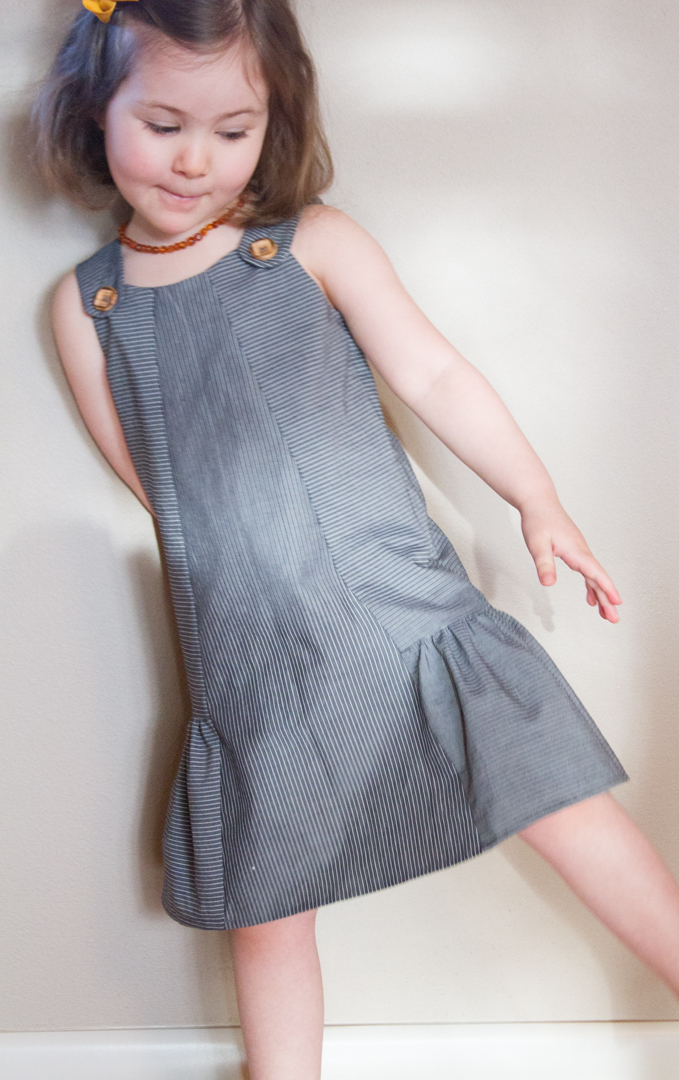
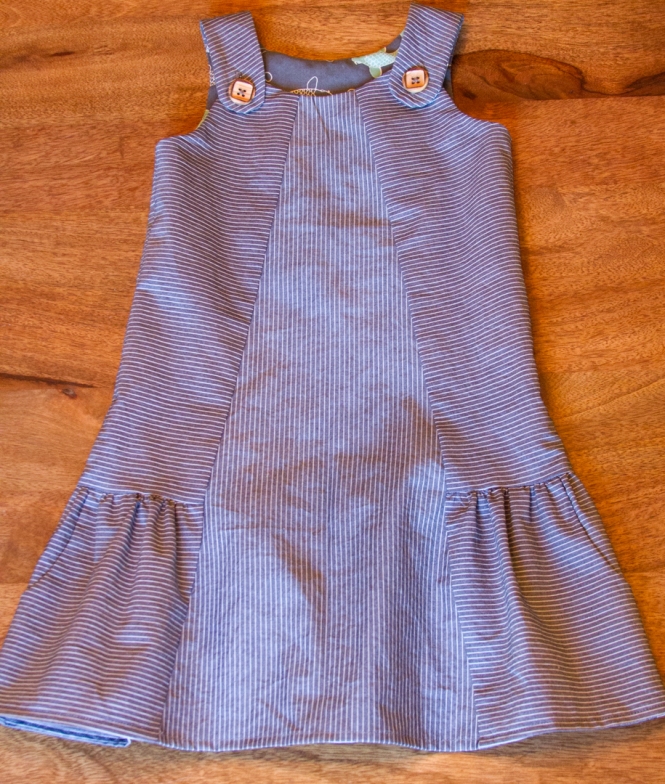
It’s tutorial time! Here’s how to do the angled front and back seams for the Seashore Sundress by Oliver + S that I sewed for KCW day 4.

IMG_9425

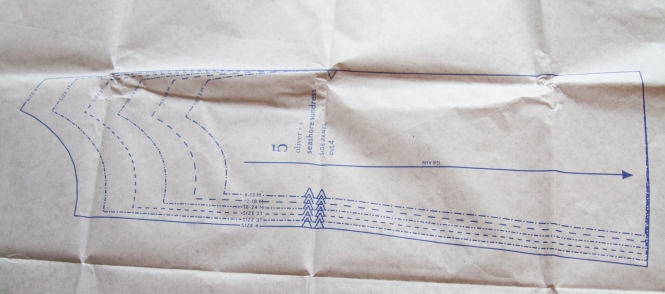
You can see from the original pattern that the seams in the front and back are straight up and down. Here’s a few pictures of how I modified the seams; this is what I’m going to teach you how to do!

IMG_9297IMG_9298

First off, I’d highly recommend tracing all your pattern pieces rather then cutting your pattern. We’ll be slicing and dicing and you may wish to keep your pattern intact. Plus if you make a mistake, it’s no big deal and you can just start over with a fresh re-trace 🙂 I traced my pattern onto tracing cloth, which can be sewn together. This isn’t necessary but will make some steps in this process easier on you.

First, trace all pieces in the size you are making. You will need to trace two copies of piece 5 -Side Panel. We will be making separate side front and side back pattern pieces.

IMG_9426

Once everything is traced and cut, sort out these pieces: 3 – Front Ruffle, both 5 – Side Panel (you cut out two remember?), 6 – Front Panel, and 7 – Back Panel. These are the pieces we will be modifying. The rest can be set aside.

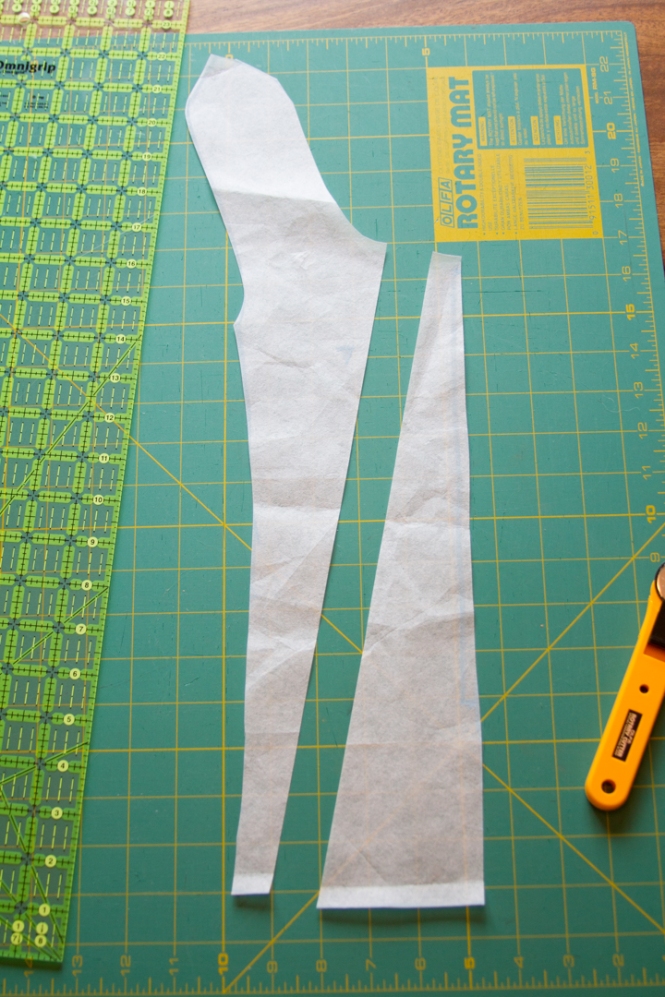
Let’s start with piece 6 – Front Panel. With a straight edge find where you’d like your new seam to be. I drew mine (for a size 3) at 5/8″ from the top edge down to the bottom corner of the piece. This line will be the actual seam. Once you like where your new seam is, cut it on the line.

IMG_9429

You now have two pieces, on the right is the new Front Panel. The left piece I’ll call very technically “Leftover Front Panel Piece”.

IMG_9430

Clearly mark on your pieces what they are and set them aside for now. On to the back panel.

Grab piece 7 – Back Panel. Lay your newly cut Front Panel on top of the Back Panel, lining up the top and fold side edge. Don’t worry about the Front Panel being much longer then the back, just make sure the top edge and the fold side edge line up. Trace the cut line and cut your Back Panel.

IMG_9431

This is your new Back Panel on the right, and Leftover Back Panel Piece on the left.

IMG_9432

Clearly mark your new pieces and set aside your Leftover Back Panel Piece. We’re going to finish your Front and Back Panel pieces now.

On the sides you cut you will now need to add in your seam allowance. Oliver + S uses a 1/2″ seams so that’s what we’ll be using. Retrace your pieces to include the 1/2″ seam allowances. Remember to mark your new Back and Front Panels with the fold markings so you don’t forget to cut them on the fold!

IMG_9433

Your Front and Back panels are complete! Yay! Now to construct the Side Front and Side Back Panels. First we’ll do the Side Front Panel.

Grab one of your piece 5 – Side Panel’s and your Leftover Front Panel piece. Sew the two together right sides together with a 1/2″ seam, making sure to match the notches. The bottom and top edges will not line up, but don’t worry, just match your notches and you’ll be fine :). Once sewn together you will see the Leftover Front Panel piece has a little tail that extends past the bottom edge of the Side Panel. Cut it off so that the bottom edge is even with the Side Panel’s edge. Don’t worry, we’ll adjust the Front Ruffle piece to make up for it. This is your new Side Front Panel! You still need to add in your 1/2″ seam allowance, so smooth out your new Side Front Panel (it won’t want to lie completely flat but just smooth as best you can paying special attention to the width at the very top and very bottom of the piece so that no width is lost during the re-trace) and re-trace it with 1/2″ added to the old “Leftover Front Panel” side of the piece.

IMG_9436

You’re done with the Side Front Panel! Now to construct the Side Back Panel.

Get your remaining piece 5 – Side Panel and your Leftover Back Panel piece. Sew them together right sides facing with a 1/2″ seam starting at the bottom edge of the pieces and making sure the bottom edges are aligned. Smooth your pattern pieces open and re-trace it with 1/2″ added to the old “Leftover Back Panel” side of the piece. You just finished your new Side Back Panel piece!

IMG_9435

Hang in there with me! We’re almost done. Now we have to modify piece 3 – Front Ruffle to make up for the tail we cut off. Extend the top edge out by 1″ and with a straight edge connect the extended edge down to the bottom corner. Re-trace this piece with these changes.

IMG_9434

Guess what? You’re done! Now you just have to actually sew the dress 😉

I hope you like my tutorial! If you have any questions please feel free to leave me a comment!


Kid’s Clothes Week day 7

That was one fast week! I don’t think I’ve ever gotten so many projects done in 7 days before! Here’s the last little number I finished the week up with.

IMG_9400

For day 7 of Kids Clothes Week I know I wanted to do something quick so I made the Lazy Days skirt by Oliver + S. This pattern is incredibly fast, easy, and satisfying to sew up. Not only that but Oliver + S offers this pattern for free on their website!

IMG_9407

I sewed this in one of my most favorite fabrics, Robert Kaufman union dot chambray. I only slightly modified the pattern by finishing the bottom edge with bias tape rather then ribbon. For this reason I cut the length of the skirt to the precise length I wanted and incased the raw edge in the bias tape using stitch in the ditch method. I love the finished look!

IMG_9402

For a special touch I added a neon orange tag from some remnant bias tape (yes I save the remnants.. hoard much?) to mark the back of the skirt. Love that color!

IMG_9406

I am absolutely making one of these for me, and for my daughter’s doll. Union dot skirts for everyone!


Kid’s Clothes Week days 5 & 6

I have a confession… I got a little side-tracked from my KCW sewing list. How could I not after Oliver + S released their new digital pattern, the School bus t-shirt? Plus with all the sunny/warmer weather we’ve been having I had a serious t-shirt making itch to scratch. And so I spent yesterday and today making tees.

IMG_9310

IMG_9312

IMG_9308

I made three t-shirts, two for my girl and one for my boy. The first for my girl I sewed in size 4 view B with a slight modification to the length in the back; I added about 2 inches and rounded it out to the side seams to create some extra length. For the fabrics I used Heather Ross’ strawberry knit print from the Briar Rose collection, and a surprise back in a sparkle striped gray/black jersey from my stash. I love these two fabrics together! They are sweet and funky, just like my little girl.

IMG_9317

IMG_9322

The second tee is also size 4 view B but with it widened a little for a baggier fit. For the fabrics I used an Alice in wonderland knit from my stash and the back has a peek-a-boo lace cutout of stretch lace from Joann’s.

IMG_9334

IMG_9352

The third tee for my boy I sewed in size 18-24 months in view A. The fabric is an awesome mushroom cotton knit from my stash (so thrilled to have used up tons of stash fabric with these tees!).

IMG_9380

IMG_9375

I love how fast these were to sew up! I’m only a novice-intermediate knit sewer but still managed to crank these out with only a few snafu’s. Don’t be afraid of knits! Oliver + S gives you so many helpful hits and tips along the way.

IMG_9340

Action shot! She loves her Alice tee!


Kids Clothes Week day 4

IMG_9283

The theme for Kids Clothes Week is “Mini Me” and I must say it’s a pretty convenient theme to sew for since I tend to dress my kids in stuff I’d wear anyways, and this is no exception. The bones for this sewing pattern is Oliver + S Seashore Sundress in size 3 width 4 length, but I pretty heavily modified it. I just couldn’t get out of my head this stripe blocking, and I really wanted the seams to be on the diagonal in the front and back. The original pattern has straight seams so I had a bit of trial and error re-drafting the pattern pieces.

IMG_9271

But I managed to figure it out! *Edit* I have a tutorial up for the angled seams here!

The diagonal  front and back seams weren’t the only modifications. I also rounded out the front tabs on the straps, and scooped out the front neck about 3/8″. I felt with all the stripes I wanted softer round edges instead of the original pointed tabs and v neckline.

IMG_9284

The fabrics I used are the same I used on my son’s Sailboat pants from KCW day 3 since I wanted them to have matching outfits for the beach this month. The fabrics are Robert Kaufman railroad stripe in indigo and the lining is Playing Koi by Birch.

IMG_9301

IMG_9304

I’m so thrilled with how this one came together! I was a little worried about fit with all the re-drafting I did but it really fits my girl perfectly.

IMG_9289

I’ll try to get a few pictures of my son and daughter together in their matching outfits soon. I actually did get a few but my son is crying in all of them! Such is life 😉


Kid’s Clothes Week day 3

IMG_9245

Oliver + S Sailboat Pants, how I love thee. So sweet, simple, and fast to sew! I have had this pattern for years and finally got my rear in gear and made these awesome pants. I sewed these for my boy in size 18-24 months, which I felt was just a touch roomy and was exactly what I expected as he’s a tall 15 month old. For the fabric I used Robert Kaufman Railroad stripe in Indigo. I’m in love with the Railroad fabrics right now and thought the stripes would work perfectly with these pants.

IMG_9251

For the lining I went nautical and used Playing Koi by Birch. Railroad meets nautical, I think it works 🙂

IMG_9256

For the side panels I had fun with the stripes and went horizontal. I really love the look and am so glad I went for it! I’m planning to do a matching Seashore dress for my daughter in these fabrics and there will be all kinds of playing with the stripe direction as well!

IMG_9243

Action shot! Love the buttons on his little pudgy belly.

IMG_9254

I love these pants! If you haven’t tried this pattern from Oliver + S I’d highly recommend it. I hope the rest of KCW goes as quickly as today’s sewing did, and since the rest of my projects are also Oliver + S I’m anticipating smooth sailing!

* These pants got featured on Kid’s Clothes week! Yay! Check it out here  *


Kid’s Clothes Week day 2

Today was prep day as it had been pushed back from day 1 to finish my daughter’s birthday cloak. I’m pretty sure I won’t be able to finish all these projects this week but I’ll give it a good shot none the less!

Here’s a sneak peak at what’s in the works:

IMG_9258

A sailboat top for my boy to coordinate with his sketchbook shorts,

IMG_9260

Sailboat pants also for my boy and matching Seashore sundress for my girl,

IMG_9259

And lastly a Sketchbook shirt for my boy to coordinate with the sailboat pants.

Quite the list isn’t it? Wish me luck!

Kid’s Clothes Week day 1

I’m so excited about Kid’s Clothes Week! It’s gives me an excuse to plan out some great projects and then sew like a mad woman which are two of my most favorite things to do 🙂

Day 1 for me was actually wrapping up a project that was supposed to be finished before KCW even started… but the children had different plans. So I rolled with it and had day 1 be about finishing a fairy dress up cloak for my daughter’s birthday this month.

IMG_9231

I used the Oliver + S Red Riding Hood pattern from the book of “Little Things to Sew”. I decided to sew it in a size Large which is supposed to fit ages 5-10 and my daughter is turning 4 so I know it will be pretty huge on her, but I’m ok with that!

IMG_9228

The fabrics I used are a sage green stretch velvet and a shimmery berry colored lining fabric, both from Joann’s. I had some trouble sewing a stretch outer fabric to a non-stretch lining since the velvet wanted to.. well.. stretch! It made matching seams and edges kind of tricky. I just pinned everything with a million pins and it turned out well.  For the neck closure I picked out a matching ribbon and modified the closure by having it tie rather then doing a loop and button. It feels so whimsical to have a big bow to tie! The metallic silver lace on the hood was from my stash. I think I’ve had it for about 8 years, no joke. It was high time to use it up! Plus it was the EXACT perfect length. Serendipitous? Yes, I think so too 🙂

IMG_9230

It turned out so much better then I thought! Not that I thought it wouldn’t be great but when I finished it I just thought “WOW!”. I can’t wait to give it to my girl for her birthday and get some action shots of her wearing it! None for now though; it’s to be a surprise 😉